NSTabView tutorial
 Let’s kick off the new year with some nice MacOS X Cocoa programming. I made a small music player in which you can switch views by pushing buttons. So on the click of a button, it replaces the content of the window with a new view. It is an interface that you now often see on phones and tablets, but I liked choosing this interface for my MacOS X desktop music player program.
There are different ways to accomplish the desired effect. I started out by replacing the window content, but the code turned out much cleaner when I opted for NSTabView. I didn’t find many good examples of using NSTabView online, hence the reason for writing this blog entry. Cocoa programming is not very hard, just very confusing if you don’t know how to use its components.
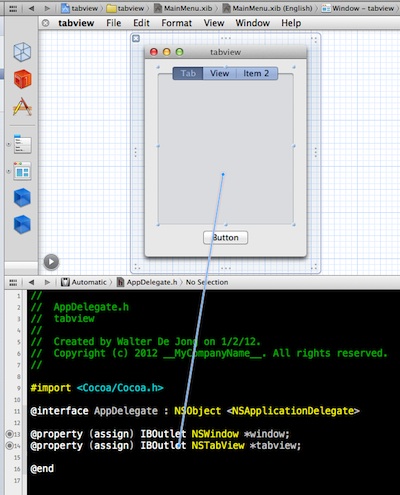
Start out by dragging an NSTabView control to your window in Interface Builder (IB). If you want, you can make the tabview encompass the whole window. By default, a tabview has a row of buttons with which the user can select tabs. In my case, I want to have a single button that controls the tabview. You can disable the row of buttons by selecting Style:Tabless in the Attributes Inspector, but it is best to leave it on while still developing.
The NSTabView has a number of Tabs you can set in the Attribute Inspector. This sets the size of the internal array that point to the views. Also, set the Initial Tab to the tab that you want it to display first.
Now open the Assistent editor and Ctrl-drag the NSTabView into the source AppDelegate.h. This will create the IBOutlet for this tabview. You can now use [self tabview] to programmatically address the control in AppDelegate.m.
 You would think there is a way to hook up NSViews to the NSTabView from within IB … I have not found out how to do this. So to make it display your custom views, you will have to tell it from code.
Oddly enough, NSTabView doesn’t directly deal with views. It deals with NSTabViewItems. We don’t have to deal a lot with NSTabViewItems to accomplish what we want, but you should be aware that NSTabView uses tab view items that hold the views for us.
Now, you can either add a new custom view in MainMenu.xib or create a new NSViewController class. The first option sounds easier but your application will have to contain code to control all these views. It makes more sense to give each view its own controller. Especially if your project is large you will want to have separate views and view controllers. It keeps the code cleaner and even makes the views reusable.
Let’s create a new NSViewController class. Choose from the File menu New File and select Cocoa Objective-C class. Next, choose your class name “FirstViewController” and choose Subclass of NSViewController. This creates three new files: a header, a .m source, and a FirstViewController.xib. The XIB contains your new custom view. Start out simple; draw a label saying “View 1”.
Repeat this step for view 2 and any other views you may have.
Now we have a NSTabView in the main window and a bunch of NSViewControllers with associated custom views. We want to put the views into the tabview.
First we have to tell the application that it has these custom views. The easiest way to do this is to instantiate them in IB. Open the MainMenu.xib and drag an NSViewController object from the Object library into the area where the other objects (like File’s Owner, First Responder, and AppDelegate) are. Select the NSViewController and in the Identitity Inspector, set the custom class to FirstViewController. In the Attribute Inspector, set the Nib Name to FirstViewController.
Open the Assistent editor and Ctrl-drag the view controller icon into AppDelegate.h. Name it firstViewController. This should create a line like:
@property (assign) IBOutlet FirstViewController * firstViewController;
This will create a compiler problem that is easy to solve; in the top of AppDelegate.h put:
#import "FirstViewController.h"
Now we can finally go tell NSTabView to use this view. Open AppDelegate.m and implement this code:
- (void)applicationDidFinishLaunching:(NSNotification *)aNotification {
    // Insert code here to initialize your application

    // put the views into the tabview
    NSTabViewItem *item;
    item = [[self tabview] tabViewItemAtIndex:0];
    [item setView:[[self firstViewController] view]];

    item = [[self tabview] tabViewItemAtIndex:1];
    [item setView:[[self secondViewController] view]];
}
Build and run the application. The tabview should be working now.
For code cleanliness, I numbered my tabs using an enum so I can address them using symbolic constants. It is also possible to give each tab an identifier and select them by identifier.
Originally I wanted to have a single button control the tabview, so Ctrl-drag the button right into AppDelegate.m to create an IBAction for the button. What’s really lame is that you can’t ask an NSTabView what the index of its currently selected item is. You get an NSTabViewItem instead but I find working with indexes much more convenient. Here’s a simple example of a button that cycles through all tabs:
- (IBAction)buttonPressed:(id)sender {
    static int cycle = 0; // assume initial tab was first

    cycle++;
    if (cycle >= [[self tabview] numberOfTabViewItems])
        cycle = 0;

    [[self tabview] selectTabViewItemAtIndex:cycle];
}
Now that the tabview is finally working, change the style of the NSTabView control in IB to Tabless.
This concludes my NSTabView tutorial. As said, Cocoa is not very hard, just confusing if you don’t have a clue, and it can be tedious to get seemingly simple things done.