Xoshiro and splitting in the mix
 Nearly exactly 10 years ago I wrote about using the XorShift fast pseudo
random number generator (PRNG) in game code. XorShift128+ is a nice little
algorithm. Its creator, mathematician and computer scientist Sebastiano Vigna,
has not been sitting still since. The newer family of small and fast PRNGs
(by Vigna and Blackman) are named
Nearly exactly 10 years ago I wrote about using the XorShift fast pseudo
random number generator (PRNG) in game code. XorShift128+ is a nice little
algorithm. Its creator, mathematician and computer scientist Sebastiano Vigna,
has not been sitting still since. The newer family of small and fast PRNGs
(by Vigna and Blackman) are named xoshiro (xor, shift, rotate) and
xoroshiro (xor, rotate, shift, rotate).
A good random number generator is fast, has good distribution, and doesn’t produce repeating sequences.
Why use a specific random implementation, rather than relying on what stdlib
provides? I like knowing what the code does, and for game code it is important
that it runs very fast. Moreover it is important that for a fixed seed
it produces the same series of numbers every time—even on different platforms,
or with different versions of stdlib. Imagine doing procedural generation
using fixed seeds, and then one day all of sudden everything is completely
different because the underlying random function changed. We can’t have that
happening.
The xoshiro256++ algorithm produces 64 bits random integers. It uses four
ints as internal state. The code is simple and short:
static uint64_t state[4];

uint64_t xoshiro256plusplus(void) {
    const uint64_t result = rotl64(state[0] + state[3], 23) + state[0];

    const uint64_t t = state[1] << 17;
    state[2] ^= state[0];
    state[3] ^= state[1];
    state[1] ^= state[2];
    state[0] ^= state[3];
    state[2] ^= t;
    state[3] = rotl64(state[3], 45);

    return result;
}

// bit rotation in C
uint64_t rotl64(uint64_t x, int k) {
    return (x << k) | (x >> (64 - k));
}
There is a mathematical funkiness about the generated sequence of numbers
in that you can jump ahead and skip over large blocks of numbers. The algorithm
includes jump() and long_jump() functions that appear pure witchcraft.
Look into the source code to find these gems.
Sowing the seeds
The random number generator must be seeded; the state must be initialized.
It is considered good practice to seed a PRNG with another algorithm;
here we use SplitMix64. It is said to be the random function in Java:
uint64_t splitmix64(uint64_t a) {
    uint64_t z = (a += UINT64_C(0x9e3779b97f4a7c15));
    z = (z ^ (z >> 30)) * UINT64_C(0xbf58476d1ce4e5b9);
    z = (z ^ (z >> 27)) * UINT64_C(0x94d049bb133111eb);
    return z ^ (z >> 31);
}
So, we run four rounds of splitmix to initialize xoshiro.
What to use as input to splitmix though? You just pick whatever you like;
a fixed seed, or personally, I like reading from /dev/urandom — the UNIX
way of saying “hey kernel, give me a good random number.”
Floating point
So, we have our random integer value. What if we wish to generate
a floating point value between 0..1 ?
There is a slightly faster variant named xoshiro256+ (single plus) that is
suited for just that. This algorithm again, however, generates a 64 bits
integer. It is recommended to use only the upper bits of the generated value
for conversion to float.
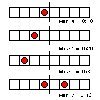
Remember that floats (or doubles) are just numbers in computer memory using IEEE encoding. Therefore we can do some bit shifting to convert an integer to float:
typedef double float64;

float64 prng_randomf64(void) {
    // Returns random float between 0..1

    // xoshiro256+ is for fast floating point generation
    uint64_t v = xoshiro256plus();

    /*
        convert integer to IEEE float
        in the range [1.0 ... 2.0]
        (therefore subtract 1.0 before returning)
    */
    union {
        uint64_t i;
        float64 f;
    } u = { .i = UINT64_C(0x3ff) << 52 | v >> 12 };
    return u.f - 1.0;
}
The above makes some sense when you know that an IEEE 64-bit float has one sign bit, an 11-bit exponent, and a 52-bit mantissa.